

This gluten free 1:1 heath bar cheesecake recipe is sweet with its toffee topping. A unique take on a delicious dessert. Make it today!

We will get to the heath bar cheesecake in a few moments but let us first reflect upon the number three. Three years. A lot can happen in three years. A lot has happened in three years. On April 29, 2017, I married Josh. When looking back on our wedding, it was such a stressful time. We had people coming to Virginia from Iraq, Canada, and different parts of the United States. Basically, no one was local and everyone came to us.

We accomplished putting together the wedding mostly ourselves. All of our table settings, cards, invites, all of that stuff was done by us. We had a nerdy wedding where each table represented a theme of the things we love. Our friends and family helped us putting on the finishing touches the day of (which was SO stressful).


The reason April was the month we chose to get married was because (for Virginia) the weather is typically beautiful. Highs in the mid 70s; not too hot and not too cold. Oh boy, well. On our day, 95°F was the high. Melting, dripping, wanting to jump in a pool, were all thoughts that continued to go through mine and Josh's mind.


I know the typical dessert for weddings is cake. Well, finding quality gluten free cake can be a challenge. I did not want to make the desserts for our wedding as we had put together everything else. We finally found a place that does gluten free desserts in the Richmond area, and decided "you know what? screw cake. we are going to do pies, mini cupcakes, cannelés and 1 cheesecake."

Why a Heath Bar Cheesecake ?
We think the list of anniversary gifts is fun, however, this year is a bit of a problem for us. Year 3 is leather and Josh is a pescetarian. Our other tradition, going to Shagbark Restaurant in Richmond is officially on hold until Corona calms down. At our own wedding, we spent so much time talking to people that we did not get to eat any of our food or desserts. So, when I asked Josh what he would like for our anniversary dinner at home this year he said "a heath bar cheesecake". I had never heard of such a thing, so, to the pantry I went!
What will you need for Heath Bar Cheesecake?
What is great about this cheesecake is that it is a no bake cheesecake. I took a tip from Sally's Baking Blog.
For the crust:
- 2 cups graham cracker crumbs
- ⅓ cup brown sugar
- 1 stick butter = 8 tablespoon (melted)
For your filling:
- 1 ¼ cup heavy cream
- Three 8 ounce blocks of cream cheese
- ½ cup granulated sugar
- 2 tablespoon confectioners sugar
- ¼ cup sour cream
- 2 teaspoon lemon juice
- 1 teaspoon vanilla
For your topping:
- Heath!
- Melted chocolate
- Melted caramel (optional)
How do you make it?
Begin with your crust:
- Mix all of your crust ingredients together and pour into a 9 or 10 inch springform pan.
- Pack it very tightly- use the bottom of a measuring cup to pack it. The tighter it is packed the better.
- Place in the freezer for 10-15 minutes.
For the filling:
- Use the whisk attachment on a handheld or stand mixer and whip the cold cream until it has stiff peaks (do this on a medium/high speed for 4-5 minutes)
- In a separate bowl, use the whisk or paddle attachment and whip the cream cheese and granulated sugar on medium speed. Scrape the sides of the bowl. Add your sour cream, lemon juice, confectioners sugar, and vanilla. Beat for 2-3 minutes on a medium high speed. If there are lumps, keep mixing until there are none.
- Using your mixture on a low speed or with a rubber spatula, fold in the whipped cream into the mixture. This is a slow process as you do not want to knock the air out of your cream.
- Remove crust from the freezer and fill the crust with your filling. Smooth the top with an offset spatula.
- Cover tightly with plastic wrap or aluminum foil. Chill for 6-8 hours at a minimum. 12 hours is ideal.
- Use a knife to loosen the cheesecake crust. Then remove the rim.
- Once removed- add the toppings.
- Melt chocolate and spread across the top of your cheesecake, and add your pieces of heath.
- Cut the cheesecake with a clean sharp knife. If you want clean slices, wipe knife after each cut.
- Serve, and enjoy!


Why should you make a Heath Bar Cheesecake?
Cheese (in general) is delicious. I love to add it to pretty much anything I can if I can get away with it. This cake though, it is unique, delicious, sweet and tangy at the same time. It is worthy of any anniversary and really, just any day of the week. So happy 3 years to my hubs, and cheers to this cake!


Was this cake worth the 3 year wait?

Heck. Yes.
Print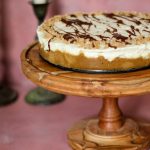
Heath Bar Cheesecake
Description
These heath bar cheesecake is a the perfect no bake treat for you and your family.
Ingredients
For the crust:
- 2 cups graham cracker crumbs
- ⅓ cup brown sugar
- 1 stick butter = 8 tablespoon (melted)
For your filling:
- 1 ¼ cup heavy cream
- Three 8 ounce blocks of cream cheese
- ½ cup granulated sugar
- 2 tablespoon confectioners sugar
- ¼ cup sour cream
- 2 teaspoon lemon juice
- 1 teaspoon vanilla
For your topping:
- Heath!
- Melted chocolate
- Melted caramel (optional)
Instructions
Begin with your crust:
- Mix all of your crust ingredients together and pour into a 9 or 10 inch springform pan.
- Pack it very tightly- use the bottom of a measuring cup to pack it. The tighter it is packed the better.
- Place in the freezer for 10-15 minutes.
For the filling:
- Use the whisk attachment on a handheld or stand mixer and whip the cold cream until it has stiff peaks (do this on a medium/high speed for 4-5 minutes)
- In a separate bowl, use the whisk or paddle attachment and whip the cream cheese and granulated sugar on medium speed. Scrape the sides of the bowl. Add your sour cream, lemon juice, confectioners sugar, and vanilla. Beat for 2-3 minutes on a medium high speed. If there are lumps, keep mixing until there are none.
- Using your mixture on a low speed or with a rubber spatula, fold in the whipped cream into the mixture. This is a slow process as you do not want to knock the air out of your cream.
- Remove crust from the freezer and fill the crust with your filling. Smooth the top with an offset spatula.
- Cover tightly with plastic wrap or aluminum foil. Chill for 6-8 hours at a minimum. 12 hours is ideal.
- Use a knife to loosen the cheesecake crust. Then remove the rim.
- Once removed- add the toppings.
- Melt chocolate and spread across the top of your cheesecake, and add your pieces of heath.
- Cut the cheesecake with a clean sharp knife. If you want clean slices, wipe knife after each cut.
- Serve, and enjoy!
Notes
Once done- you can re-cover the cheesecake and keep it in the fridge for up to 5 days.
Enjoy!
Leave a Reply